This tutorial shows how to build a simple front-camera eye tracker
with Python. The tracker estimates a 3D gaze origin and direction
that can be used for screen control, interaction experiments, and
gaze visualization.
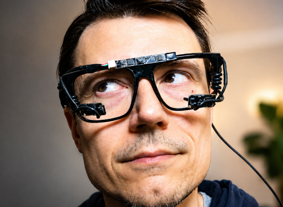
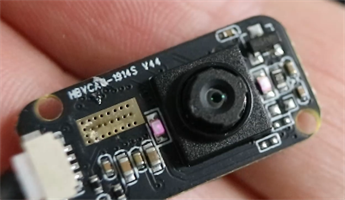
You need a small eye tracking camera,
a low cost board camera,
USB extension cables if you
need more cable length, a pair of
cheap sunglasses with the
lenses removed, soft wire cabling
or another flexible material for mounting, and
electrical tape for securing
loose cable sections. A low-cost GC0308 eye tracking camera works for
this build, and inexpensive dollar-store glasses are enough because
the frame is only used to hold the camera near the eye.
GC0308 IR cameraBoard (environment) cameraGlasses frame with no lensesSoft wire
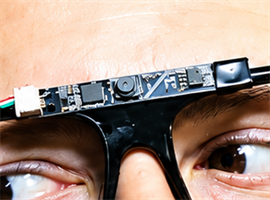
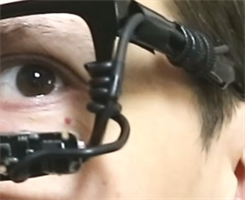
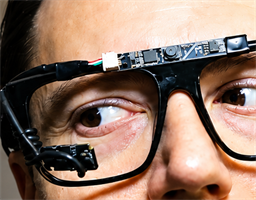
Step 2: Attach the camera to the glasses
Wrap the soft wire around the camera and cable, then attach it to
the glasses frame. Use electrical tape if you need to
secure the camera cable or keep the mount from sliding. The goal is
to make a firm but adjustable mount:
the camera should stay in place after you reposition it, but you
should still be able to bend the mount until the eye is fully visible
in the camera feed.
Both cameras mountedAdjusted mount with the eye fully visible
Step 3: Install the Python dependencies
Download Orlosky3DEyeTracker.py and install the required
Python packages. The tracker uses OpenCV and NumPy for image
processing. Tkinter is used for the startup window and is included
with many Python installations. The optional gl_sphere.py
file enables the OpenGL sphere visualization, but the tracker will
still run without it.
pip install opencv-python numpy
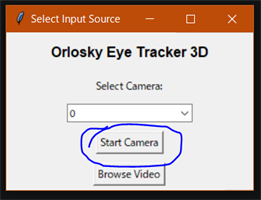
Step 4: Run the tracker
Open a terminal in the folder containing the script and run it with
Python. On startup, the tracker opens a small window titled
Select Input Source. Choose your camera from the dropdown
and click Start Camera. You can also use
Browse Video to test the tracker on an existing
.mp4 or .avi file.
python Orlosky3DEyeTracker.py
Input-source window with the camera dropdown and Start Camera button.
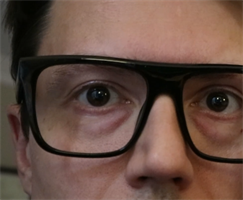
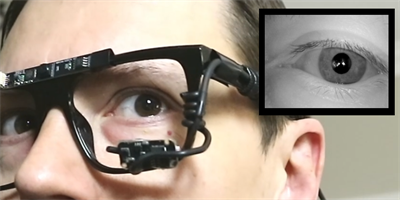
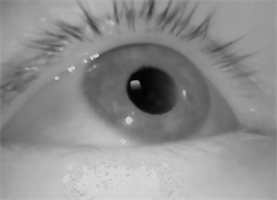
Step 5: Position the eye in the camera view
After clicking Start Camera, adjust the camera until the
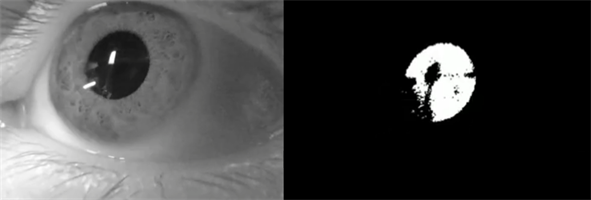
eye is clearly visible in the OpenCV window. The script crops the
frame, finds the darkest pupil region, thresholds the image at several
levels, fits an ellipse to the pupil, and estimates the eye center
from recent pupil rays. In normal use, the tracker self-calibrates to
the observed eye position as you move.
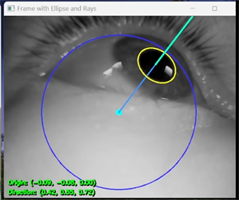
Eye centered and clearly visible in the OpenCV camera window.Dark pupil region isolated by thresholding.Pupil ellipse, estimated eye center, and gaze line overlay.
Step 6: Read the gaze output
The OpenCV output window displays the current 3D gaze origin and gaze
direction near the bottom of the frame. The script also writes these
six values to gaze_vector.txt on each frame: the three
origin coordinates followed by the three normalized gaze direction
values. Use q to quit, the spacebar to pause, e
to toggle ellipse capture, and c to clear captured
ellipses.
Once the tracker is running, you can read gaze_vector.txt
from another program or modify the Python script to send the gaze
vector directly to your application. This first setup gives you a raw
3D gaze direction. From there, you can calibrate it to a monitor, VR
headset, or another display surface for interaction experiments.
For the VR installation process, see this
video or this
tutorial.
Step 8: Use AI to build your own gaze application
You can use an AI coding assistant or large language model to turn
this tracker into your own application. Start by giving the model the
Python script, explain what the gaze vector represents, and describe
the interaction you want to build. Ask for small changes first, test
each version, and paste any error messages or unexpected behavior
back into the chat so the model can help you debug.
These sample prompts can help you get started:
I have a Python eye tracking script that writes gaze data to gaze_vector.txt as:
x_origin,y_origin,z_origin,x_direction,y_direction,z_direction

Explain how this data could be used to control a simple application.
Modify this Python eye tracking project so another Python program can read
gaze_vector.txt and move a cursor or marker on screen based on the gaze direction.
Keep the first version simple and explain where I should paste each code change.
Create a small demo app that reads gaze_vector.txt in real time and displays
a dot moving on a 2D window. Include smoothing so the dot does not jitter too much.
Help me add a calibration step to this gaze tracker. I want the user to look at
points on the screen, save the measured gaze vectors, and map future gaze vectors
to screen coordinates.
I want to use this eye tracker for a custom interaction project. Ask me the
minimum questions needed, then propose a simple first prototype using the existing
gaze_vector.txt output.
Here is the error message I get when running the eye tracking code. Explain what
is probably wrong and give me the smallest code or setup change to try first.