Building the Head-Gaze Tracker
Step 1: Hardware
You just need a computer and a standard webcam. I recommend the
Logitech Brio 100 webcam
because it is inexpensive, has a clear HD image, and gives the
tracker enough resolution for reliable face landmarks. A built-in
laptop camera may also work if it can see your full face clearly.
Place the camera near the monitor you want to control. The tracker
works best when the camera is stable, pointed directly at your face,
and not too far above or below the center of the screen.
Step 2: Download the code
Download the open-source head tracking project from GitHub. The
monitor-control script uses your webcam, estimates a 3D head direction,
calibrates that direction to the center of your monitor, and then
moves the mouse cursor based on head motion.
git clone https://github.com/JEOresearch/EyeTracker.git
The head tracking files are in the HeadTracker folder.
If you download the repository as a zip file instead, extract it first
and open a terminal in the folder containing the head-gaze script.
Step 3: Install the Python dependencies
The tracker uses OpenCV for camera input and display, MediaPipe Face
Mesh for facial landmarks, NumPy for vector math, PyAutoGUI for moving
the mouse, and the keyboard package for the F7 toggle.
Install the required packages before running the script.
pip install opencv-python mediapipe numpy pyautogui keyboard
On some systems, global keyboard shortcuts or mouse control may require
extra operating-system permissions. If the preview windows open but
the cursor does not move, check your accessibility, input-monitoring,
or administrator permissions.
Step 4: Run the tracker
Connect your webcam, sit in front of the monitor, and run the Python
script. The current version opens camera index 0, which
is usually the default webcam. If your computer has multiple cameras,
you may need to change the cv2.VideoCapture(0) value in
the script.
python MonitorTrackingHeadOnly.py
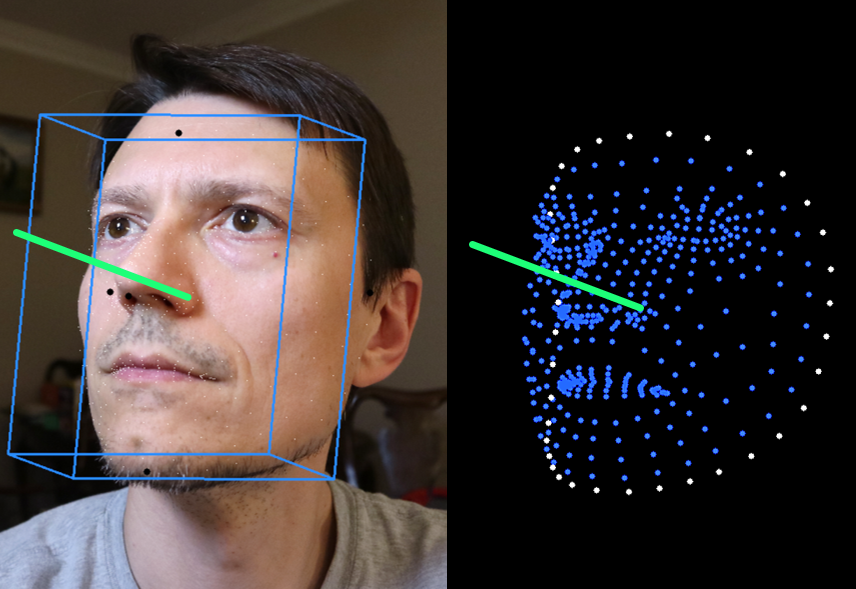
When the tracker starts, it opens two OpenCV windows:
Head-Aligned Cube and Facial Landmarks. The
cube shows the estimated 3D orientation of your head, and the green
ray shows the smoothed head direction used for screen control.
Step 5: Position your face in the camera view
Adjust the webcam and your seating position until your whole face is
visible. The script uses the outer points of your facial features to
estimate the head's left-right, up-down, and forward axes. If the face
is partially cut off, the head direction and cursor position will be
less stable.
Keep the lighting even and avoid strong shadows across the face. The
tracker smooths recent head-direction estimates, but a clear camera
image is still the easiest way to reduce jitter.
Step 6: Calibrate to the center of the monitor
Point your head at the center of the monitor and press c.
The script records the current yaw and pitch offsets and treats that
direction as the center of the screen. After calibration, turning your
head left, right, up, or down maps the cursor across the monitor.
The default mapping reaches the left and right screen edges at about
20 degrees of yaw, and the top and bottom edges at about 10 degrees of
pitch. If you want larger or smaller head movements, adjust the
yawDegrees and pitchDegrees values in the
Python script.
Step 7: Control the cursor
Once calibrated, the script moves the mouse cursor toward the screen
position calculated from your head direction. You can use this with an
on-screen keyboard, large buttons, dwell-click software, or other
assistive interaction tools.
Press F7 to toggle mouse control on or off. This is useful
if you need to pause cursor movement while adjusting the camera,
changing windows, or recalibrating. Press q in the OpenCV
window to quit the tracker.
Step 8: Tune the tracker for your setup
If the cursor feels too jumpy, increase filter_length in
the Python script to average more recent head-direction samples. If it
feels too slow or delayed, reduce that value. The script also clamps
the cursor near the monitor edges so it does not move completely off
screen.
If the cursor does not reach the full screen, reduce the
yawDegrees or pitchDegrees values. If small
head motions move the cursor too far, increase those values. Recalibrate
with c after changing your seating position or camera
angle.
Step 9: Use AI to build your own head-gaze application
You can use an AI coding assistant or large language model to adapt
this tracker for your own accessibility or interaction project. Give
the model the Python script, explain that it maps head yaw and pitch
to screen coordinates, and ask for small testable changes.
These sample prompts can help you get started:
I have a Python head-gaze tracker that uses MediaPipe Face Mesh and PyAutoGUI
to move the mouse cursor. Explain how the calibration and screen mapping work.
Modify this head-gaze tracker so it supports dwell clicking when the cursor
stays near the same point for 1 second. Keep the first version simple.
Add a small settings section to this Python script so I can change smoothing,
yaw range, and pitch range without editing constants throughout the code.
Help me make this head-gaze tracker work with an on-screen keyboard. Suggest a
simple workflow for selection, dwell timing, and pausing mouse control.
Here is the error message I get when running the head tracker. Explain what is
probably wrong and give me the smallest setup or code change to try first.